

how to find when a website was published
Posts are what make your blog a blog — they're individual pieces of content on your blog page. This guide explains everything you need to know about posts.
Posts are always associated with a date, which is included in the URL. Sometimes, posts are confused with pages. See Post vs. Page for an explanation of the differences.
Table of Contents
How to Create a New Post
There are several ways to create new posts:
- Click the Write button in the WordPress.com top toolbar.
- Go to My Site → Posts → Add New Post .
- Or, post by sending an email.
Each of these options are described in more detail below. Whichever option you choose, you will be taken to the WordPress editor where you can start writing your post. You can immediately start typing your text, add images, and more.
Use the Write Button in the Toolbar
The quickest way to start a new post is with theWrite button on the right side of the toolbar (it appears at the top of your screen when you're logged in to WordPress.com).

Click Add New Post from My Site
Go to My Site(s) → Posts and then click the Add New Post button on the right side.
Publish Posts by Email
Write your post as an email and publish it on your blog using the Post by Email feature.

↑ Table of Contents ↑
Publish Your Post
Once you've clicked Write or gone to My Site → Posts → Add New Post , you will be in the WordPress Editor, where you can write the content you want to show on your new post. Here you can:
- Write the text of your post.
- Add images.
- Give the post a category.
- Give the post some tags.
- Upload a featured image.
When you're done, click the Publish button in the top right corner of the editor to publish your new blog post to your blog.
What Happens When You Publish
Clicking that Publish button is a proud moment — you've just finessed a piece of content and shared it with the world!
A post is different from other content types (like pages and portfolios) because several actions are triggered when you publish a new post on a public blog:
- The post appears as the newest entry on your blog page.
- The post appears in Reader feeds, unless your site is private.
- Your subscribers receive an email notification.
- The post is shared to your social media profiles, if you have connected them.
↑ Table of Contents ↑
Post Settings
When working on your post, you'll see the Post settings on the right side of your screen.
⚙️
If the post settings are not there, you may need to click on the ⚙️ (gear) icon in the top right corner to bring up the settings.
Here you will find the following options:
- Status & Visibility: Tells you basic information about the post, including the author, visibility status, publish date, and whether the post is sticky or not. Learn more about these settings.
- Revisions: Allows you to see the most recently saved changes to the post.
- Permalink: The URL that the post or page will appear at. By default, this is the title you give the post, but you can change it here.
- Categories: Only shows on Posts. Allows you to add or assign categories to the post.
- Tags: Allows you to add or assign tags to the post.
- Featured Image: Allows you to display a unique custom header image for the post or set a thumbnail for special features of your theme.
- Excerpt: Write a brief excerpt for the post that may appear on various thumbnails throughout the site, or as a preview for search engine results.
- Discussion: Enable comments and pingbacks.

In the top right above the post settings, you'll see a toolbar that looks like this:

From left to right, these options are:
- Switch to Draft: This allows you to turn a published post back into a draft. (If you're working on an unpublished draft, this will saySave draft.)
- Preview: See what your post will look like on the live site.
- Update: Select to save changes you've made to a published post. (If you're working on an unpublished draft, this will sayPublish.)
- Gear Icon: Use to toggle the Post or Block settings.
- Jetpack Icon: Use to see Jetpack-specific options like sharing and shortlinks.
- Ellipses Menu (the three vertical dots): Open more post editor settings, including ways to edit the entire page via HTML, manage reusable blocks, copy the entire content of the post, focus on one block at a time, and more!
↑ Table of Contents ↑
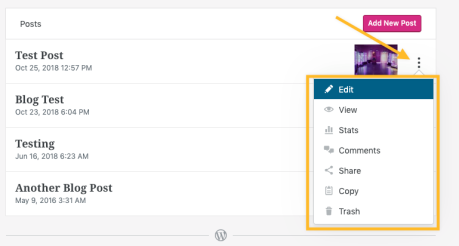
View Your Posts
To view a list of all the posts on your site, go to My Site → Posts. Here, you will see four tabs:
- Published: Posts you have made available to be read on your blog. Learn more.
- Drafts: Posts you have started, but have not yet published. Learn more.
- Scheduled: Posts you have scheduled to be published in the future. Learn more.
- Trashed: Posts you have deleted. Learn more.
To see more options for a post, click on the ellipses menu (the three vertical dots) next to any post. Here you will see:
- Edit: Opens the WordPress Editor so you can make changes to the post.
- View: See what the post looks like on your site.
- Stats: View the stats page for the individual post.
- Comments: Manage comments for the post.
- Share: Share your post to social media accounts connected to your site via Publicize.
- Copy post: Creates a duplicate copy of the post. Learn more.
- Copy link: Copy the link (i.e. the URL) of your post to your clipboard.
- Trash: Deletes the post and places it in the Trashed tab.
↑ Table of Contents ↑
Join our Online Blogging Course
Gain all the fundamental (and a few advanced) skills you need to create a blog you're proud of. Define your audience. Then build, publish, and grow your blog with an on-demand, go-at-your-own-pace course taught by the best bloggers on the internet.
↑ Table of Contents ↑
Display Your Posts on a Page
There are multiple ways to display your posts on your site. Read on to learn more about each option and choose one that best suits your needs.
- Blog Posts block (if you're not sure which option to choose, pick this one!)
- Make your homepage a blog
- Set your Posts page
- Display Posts By Category
Blog Posts Block (Recommended)
Insert the Blog Posts block on any page to display your posts. You can use this to display your posts in a list or grid format of up to 100 blog posts. You can choose to show posts based on category, author, or tag, display featured images or excerpts, change the text color, and more. The block will automatically update itself with every post you publish. More details:
Make Your Homepage a Blog
If you want your site's front page to show every post you've published with the newest at the top, you can choose to make your homepage automatically show your latest posts. To do this, follow these steps:
- Go to My Site → Appearance → Customize → Homepage Settings.
- Under 'Your homepage displays', select 'Your latest posts'.
- Click Save Changes.
This is a classic blog option that displays only blog posts on your homepage. If you want to add other content to your homepage such as text and images, use the Blog Posts block instead.
Set Your Posts Page
If you want a classic blog page that shows all your posts in chronological order with the newest first, you can set a Posts page. This is similar to the 'Make Your Homepage a Blog' option above, except that the page is not your homepage. It is a separate page typically called something like 'Blog' or 'News'. To do this, follow these steps:
- Go to My Site → Appearance → Customize → Homepage Settings.
- Under 'Your homepage displays', select 'A static page'.
- Under 'Posts page', select your Blog page. If you do not have one yet, you can click Add New Page to create a new page. Call it something like 'Blog', or whatever you would like to name it.
- Click Save Changes.
This is a classic blog option that displays only blog posts on your posts page. If you want to add other content to your posts page such as text and images, use the Blog Posts block instead.
💡
If you'd like to have your posts listed from oldest to newest, you can change the default order to list posts chronologically using these instructions.
Display Posts by Category
Instead of a page that shows all your blog posts, you can use Category Pages. These pages are automatically created when you use categories on your posts. The pages display posts of that specific category only.
Click the button below to learn how to do this:
↑ Table of Contents ↑
Post Drafts
You do not have to publish your post right away. You can save a draft of your post and return to it to continue editing. When you're writing your post, you'll see the Save Draft button in the top right corner as shown here:

Draft posts appear under the "Drafts" tab of your Posts list:

Draft Pending Review
Checking the Pending Review option lets you flag posts that might need review from other authors or editors on your site.
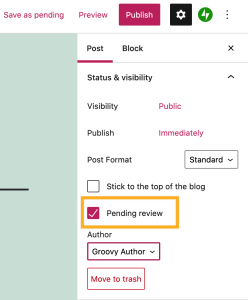
If you use post by email and have people in the Contributor role who post via email, they will automatically be set as drafts as well as pending review.
↑ Table of Contents ↑
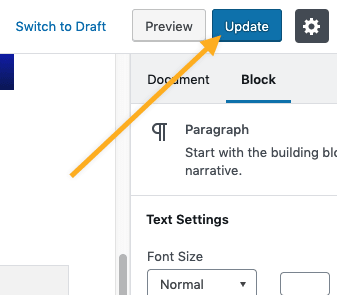
Edit and Update an Existing Post
You can edit a post that has already been published.
Go to My Site → Posts and click on the title of the post you would like to edit. This will open the post in the WordPress Editor, where you can add or remove content.
A published post will show an Update button where Publish previously was.
Click Update to push your changes live.
↑ Table of Contents ↑
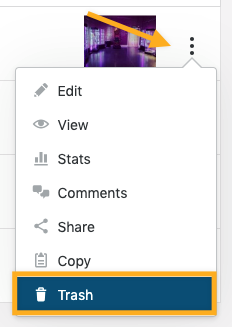
Delete a Post
The Trash feature allows you to remove posts without permanently deleting them right away. Items in your trash folder can be restored or permanently deleted up to 30 days after you trash them. After 30 days, they are deleted permanently.
To delete a post, go to My Site → Posts. Click on the ellipses (three dots) menu on the right of any post, then select Trash.
To restore a page that you've trashed, view your trash by selecting Trashed at the top of the posts screen. Select the ellipses (three dots) menu on the right and select Restore to bring the post back.
Alternatively, select Delete Permanently to completely delete the post. This is permanent and the post cannot be restored after this action is taken.

↑ Table of Contents ↑
How to Find the Post ID
You can find the Post ID in the Edit Post URL on your post editor. For example, the Post ID for the following example is "125."

how to find when a website was published
Source: https://wordpress.com/support/posts/
Posted by: judkinswrue1972.blogspot.com
0 Response to "how to find when a website was published"
Post a Comment